Hone It

The newest section of my blog goes out to all my friends who cut themselves often in the kitchen, don’t feel comfortable holding a knife or just want to be more skilled at the cutting board. So much of what we eat is already prepared for us leaving the young and middle-aged generation of foodies unprepared in the kitchen. We all eat and some of us cook but if you know what you’re doing with core ingredients, you will be doing yourself a huge favor in the long run. Have you ever read the labels for prepared meals? Sure, we’re all busy and we all eat them but they are not always a smart choice, especially day-to-day. Part of breaking the prepared-food cycle is learning the basics of cooking, like how to peel the skin off of a tomato or chop an onion. Cooking with fresh ingredients can make a simple recipe spectacular.

This new section is titled, “Hone” and is on the menu at the top. My plan is to fill it up with how to’s and techniques when it comes to prepping food. I am starting simple with two staples in most savory cooking: garlic and onions. You will learn how to efficiently prep garlic and onions so your technique will sharpen and be less daunting. I will also link my recipes to the Hone section when appropriate so you can click your way to learning a new skill that you may not have known before. When I list a cup of chopped something in my ingredients, the Hone section should help you out. I think I learned to not assume everyone knows how to prepare everything when I was teaching a class and asked a student to snap the asparagus and they had no idea what I meant. I really thought at the time that everyone knew how to snap the ends at precisely the right point. Wrong. That is what inspired me to include so many pictures and how-to instruction in my recipes. Sure, I could just give you a recipe but if you don’t know how to work your way through the ingredients, you’re not learning a thing.

I think a lot of people don’t know where to start when it comes to prepping ingredients but once you learn the basics, and I mean basic basics, the whole process becomes so much easier. I am not one for fancy chopping gadgets because I feel like I do a better, often faster, job with a knife and a cutting board. Plus, some of those gadgets are a pain in the neck to clean and the few times I have used them I always hear that voice in my head saying, “If I had just done it with a knife I’d be done by now.”

I’m proud to say that I am not one of those chefs who assumes that I know it all. I have learned from them, I have worked with them and I have always hoped to not be one of them. There’s always a trick to learn. My favorite section of my cooking magazines is always the part where they include reader tips and tricks. I have learned so much across the board from people who have come up with their own ways to make things easier and more efficient in the kitchen. One of my favorite tips was to roll up silicone mats and store them in old paper towel cylinders. I swear they used to jump out of the cabinet at me every time I opened the door and now they stay put. I have a friend who was peeling peaches with a group of ladies and was laughed at and corrected for peeling her peaches with a peeler when they did it with a knife (or vice versa). Come on ladies! There is more than one way to cross the finish line! We all have a lot to learn from each other so I invite you to share your different techniques in the comment section of my blog. Please don’t be shy!

And now, how to slice and chop garlic and onions…

—–

Garlic

Goal:

To remove the skin and chop the garlic.

You will need:

cutting board

chef’s knife

—–

Step 1:

Lay clove of garlic on cutting board.

DSC_0016

Step 2:

With the tip of your knife, trim off the root end and discard.

DSC_0017

Step 3:

Lay the knife over the clove of garlic.

DSC_0023

Step 4:

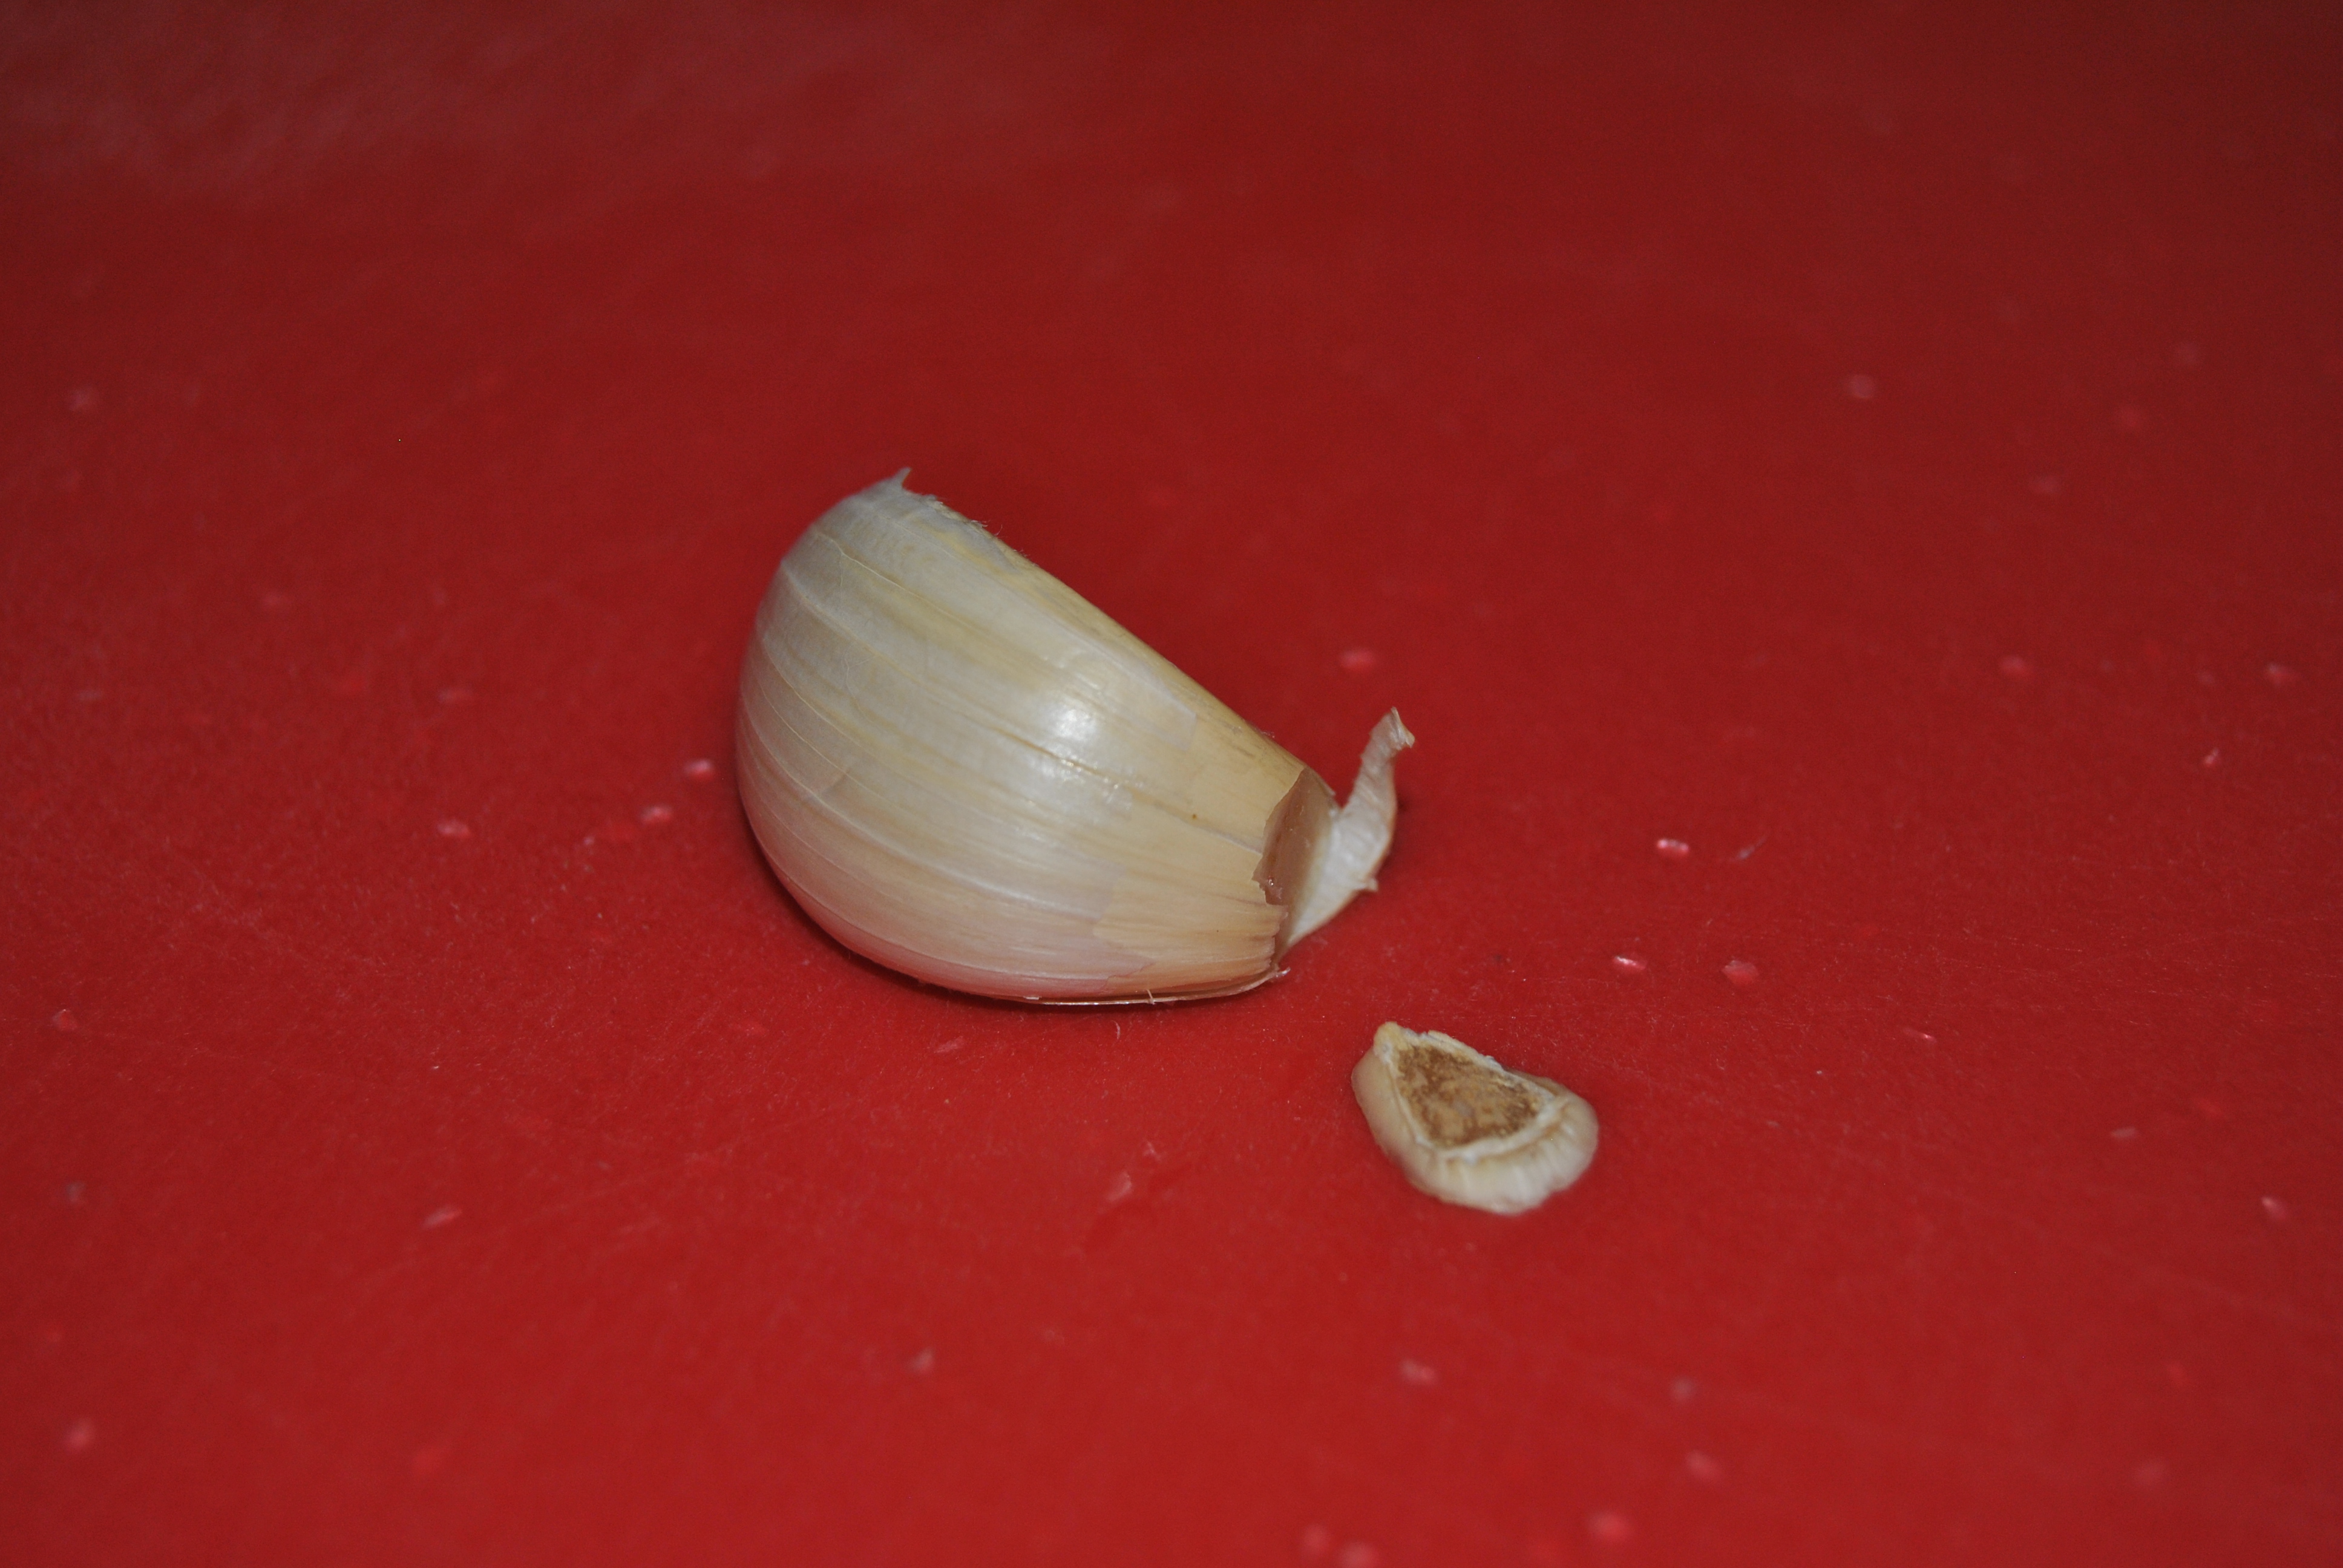
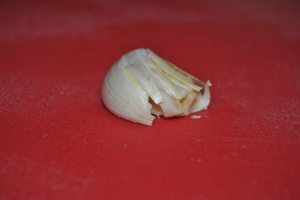
With the heel of your hand, smash the garlic clove so it bursts open.

DSC_0024

Step 5:

Set knife aside.

DSC_0025

Step 6:

Pull off skin and discard.

DSC_0026

Step 7:

If it needs to be chopped, grip the handle of your knife with your dominant hand, being sure to place your index finger and thumb on either side of the blade for more control. Place your non-dominant hand’s finger tips on the pointy end of the blade for stability and guidance. Chop in a rocking motion from side to side until you have small pieces. Carefully slide the garlic off the blade when it sticks and continue to chop until done.

DSC_0027

—–

If you want minced garlic…

Sprinkle about 1/4 teaspoon of coarse Kosher salt on the chopped garlic. Use the knife to press and pull the garlic against the cutting board, starting with the chopped garlic that is closest to you and working away from yourself, little by little.

DSC_0028DSC_0030

—–

Onion

Goal:

To dice and slice an onion.

You will need:

A chef’s knife and a cutting board.

—–

DICING

Step 1:

With your chef’s knife, trim off the stem end of the onion, leaving the root end intact (the root end is the one that looks like is is wearing a stringy wig). Discard stem end.

DSC_0002 DSC_0005

Step 2:

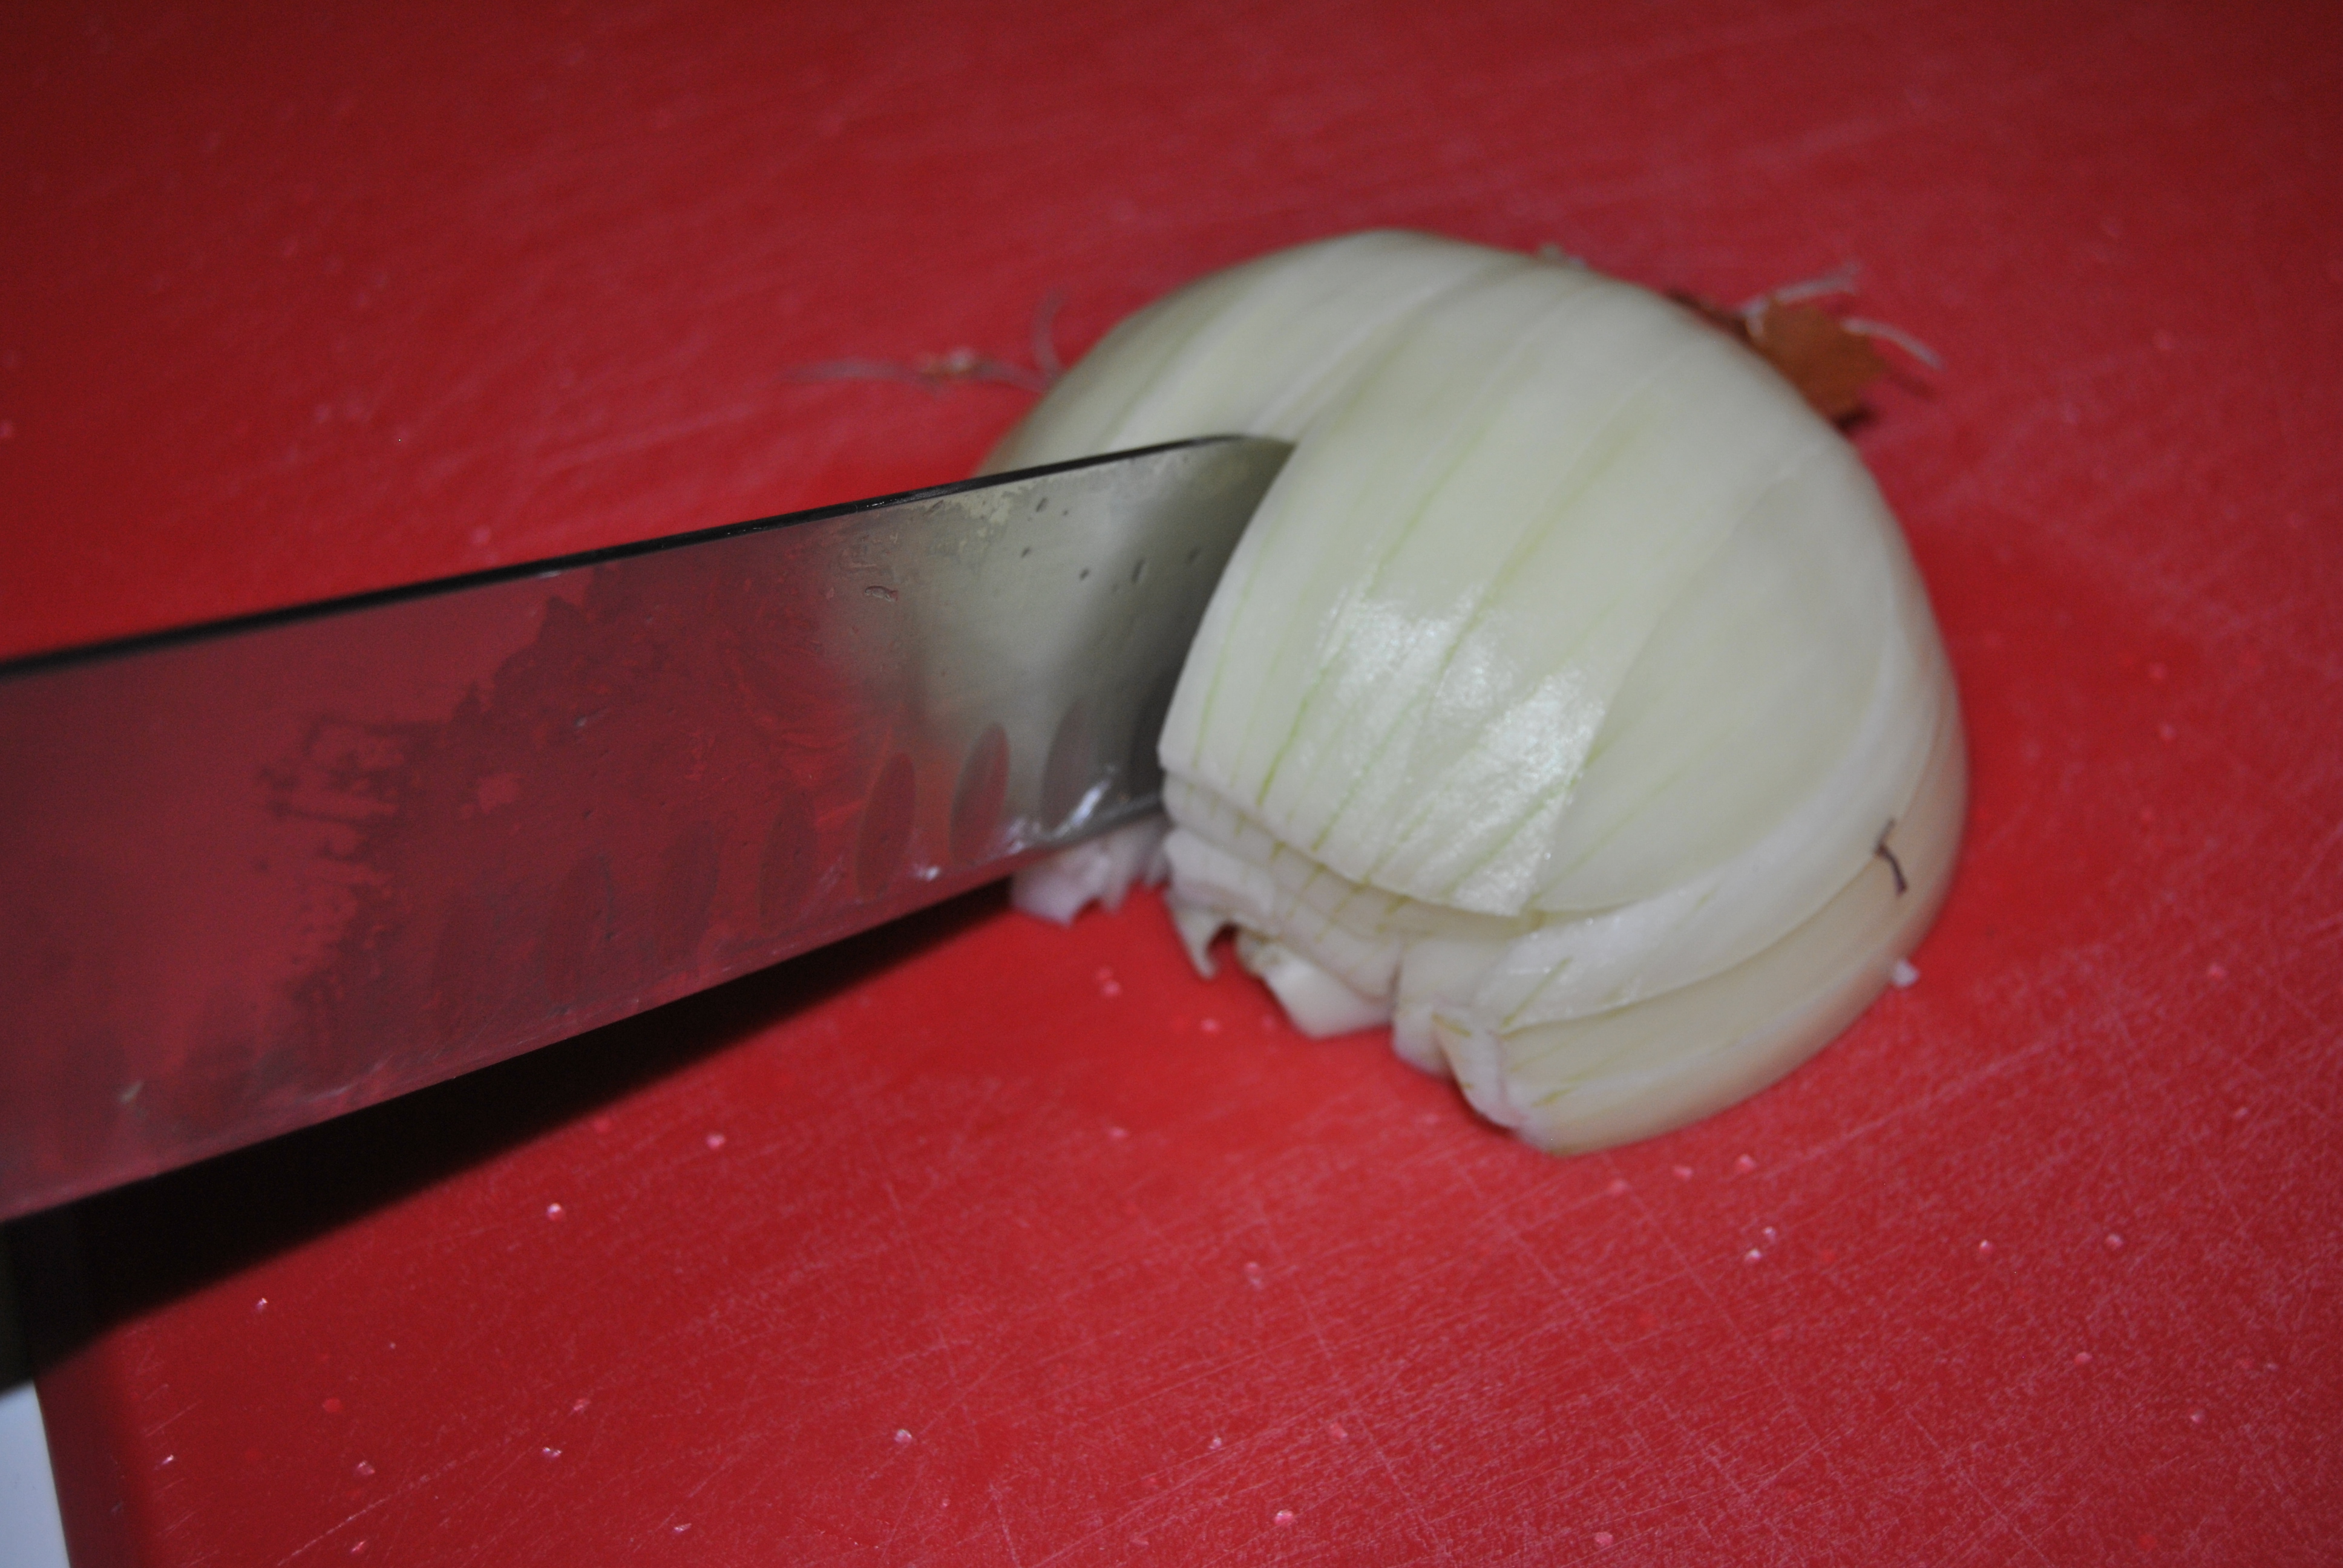
Lay onion on the flat, cut end. Cut in half, going straight through the root end.

DSC_0007

Step 3:

Remove the skin and lay the onion half (or halves if prepping both) flat on the cutting board.

DSC_0008 DSC_0009

Step 4:

With your knife, make several cuts toward the root end, parallel to the cutting board. Start at the bottom and work toward the top. Make cuts closer together for a finer dice, farther apart for a larger dice.
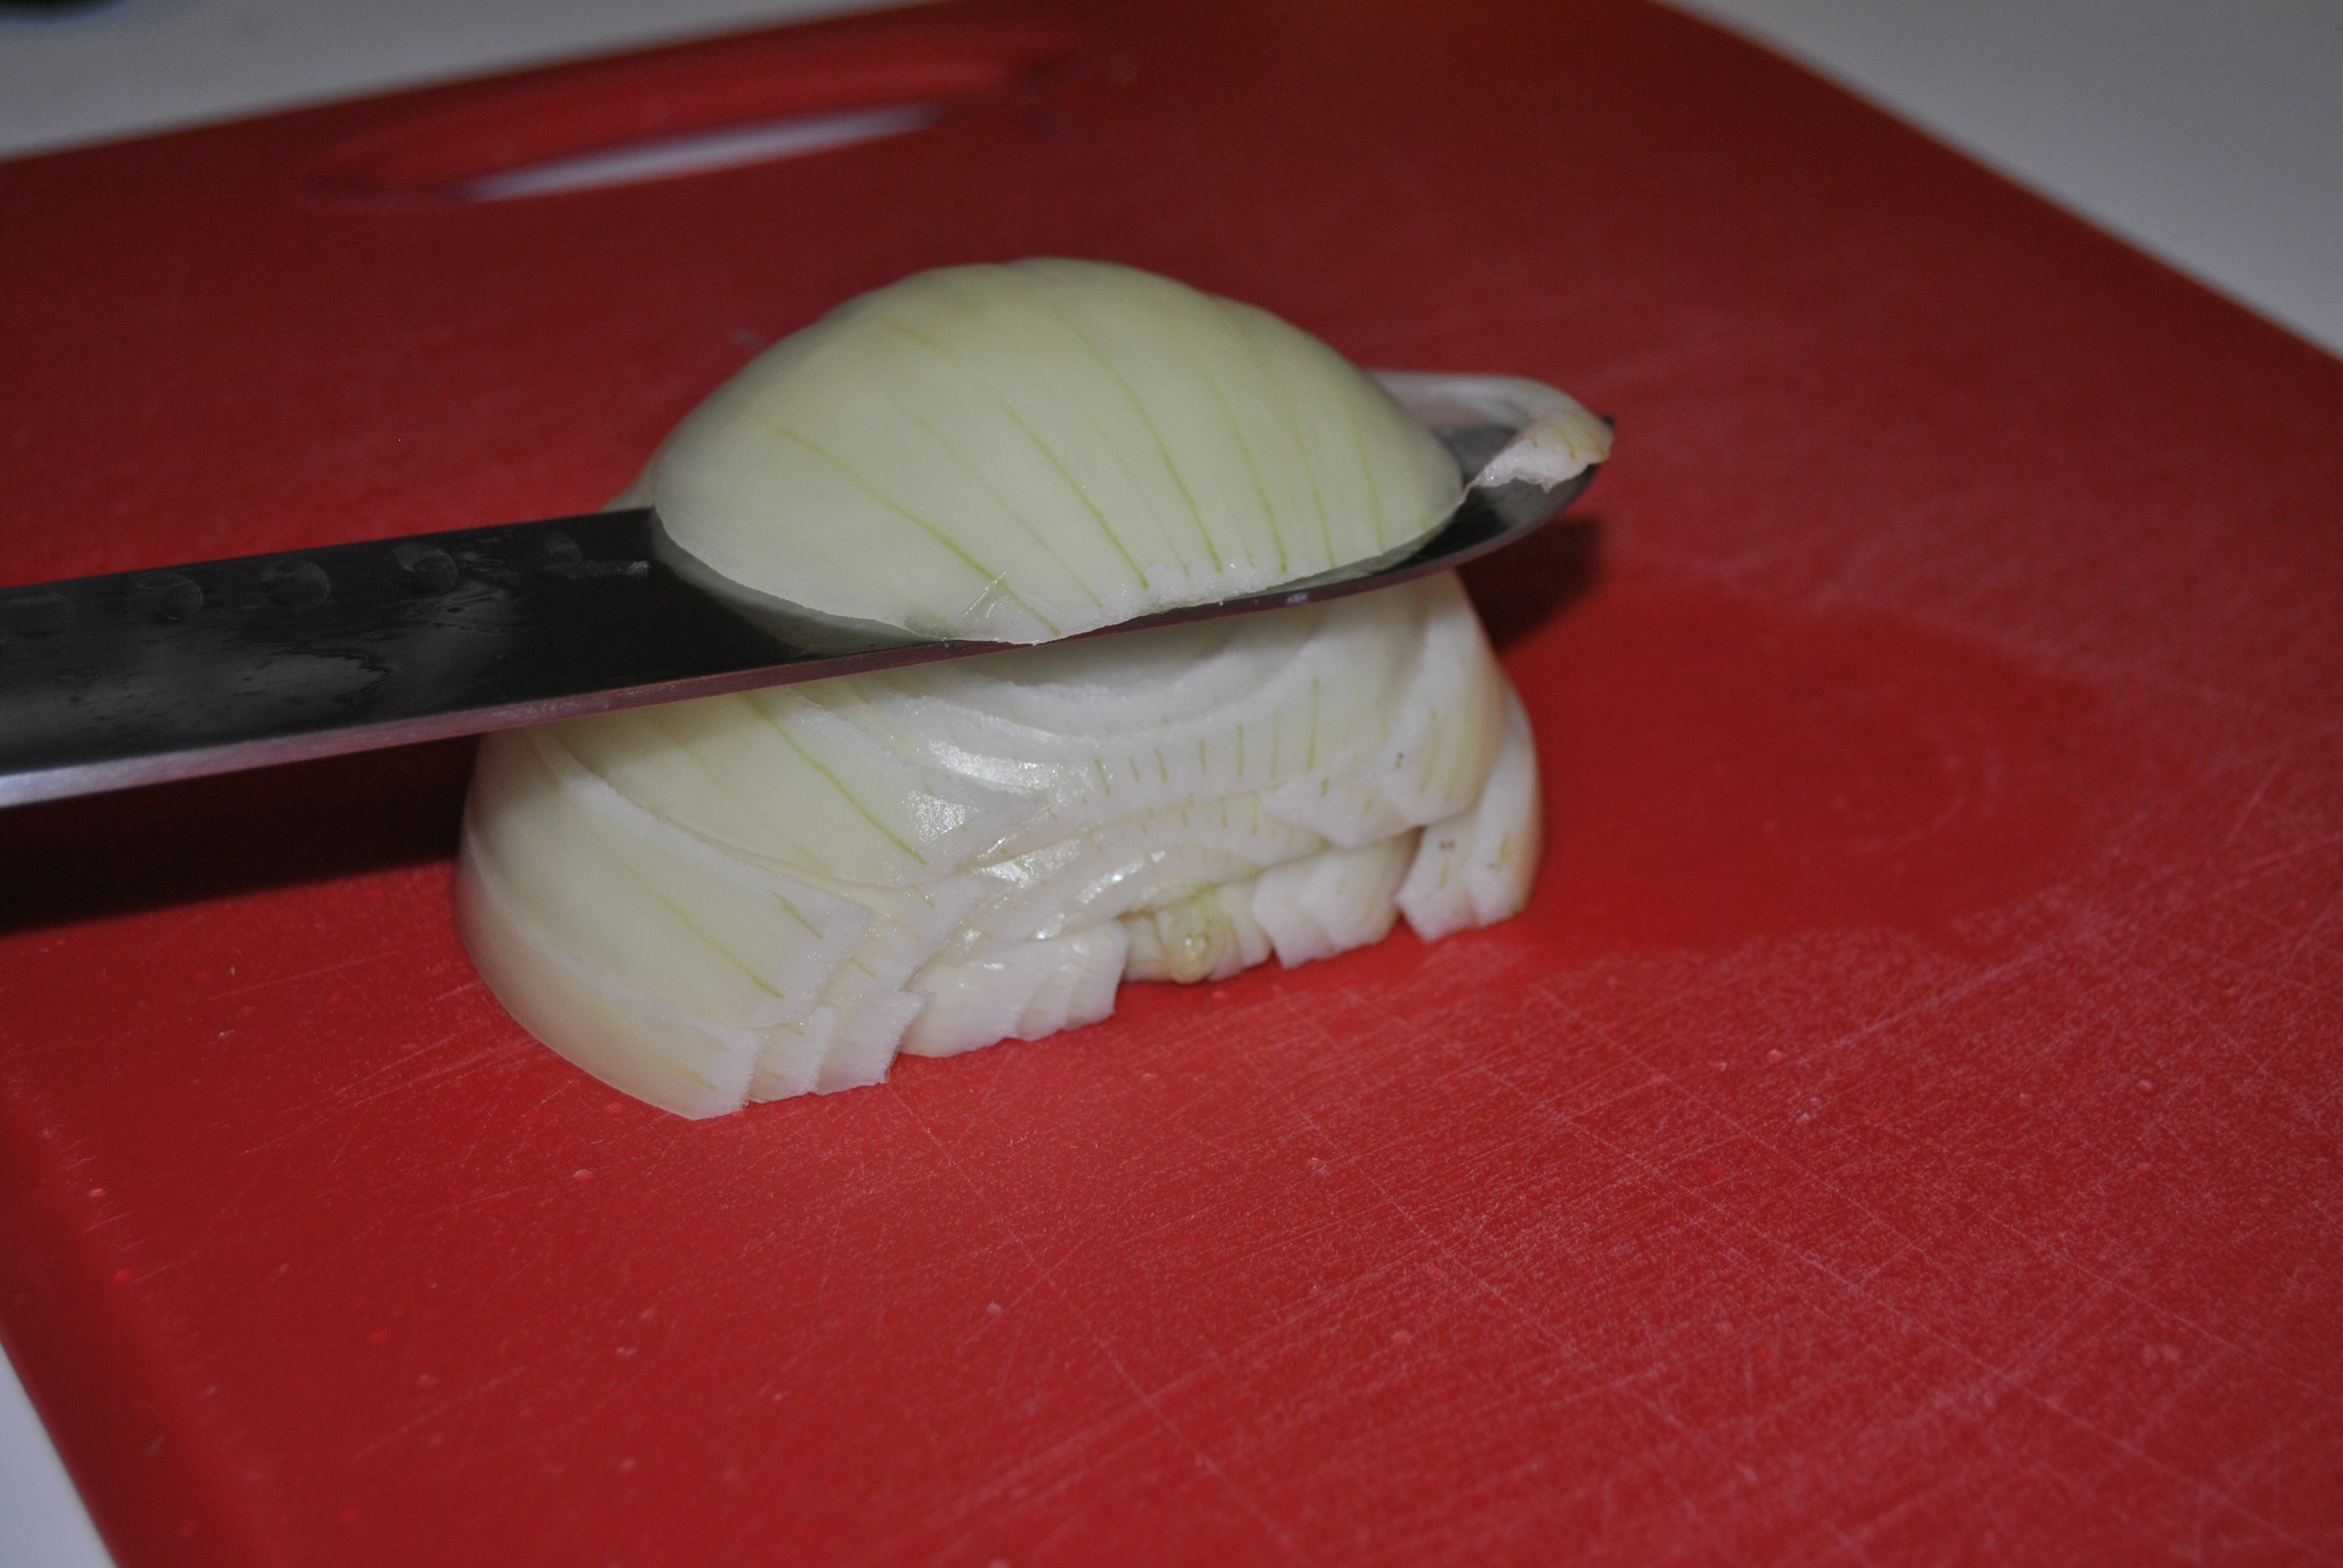
DSC_0010

Step 5:

With the tip of the knife pointed toward the root end, make several cuts from right to left (or left to right if you wish). Again, closer together for a finer dice and farther apart for a larger dice.

DSC_0012

Step 6:

Start slicing from top to bottom, working your way toward the root end. Yet again, closer together for a finer dice, farther apart for a larger dice.

DSC_0013 DSC_0014

SLICING

Repeat Steps 1-3 above.

Step 4:

Slice from top to bottom working your way toward the root end. Thickness depends on recipe.

DSC_0015

Do-It-Yourself Creamy Blue Cheese Dressing

DSC_0033There are tons of kids out there who love dipping things in salad dressing. My daughter has a friend who practically keeps ranch with her at all times. When she comes to our house and I’m out I curse myself in my head. My kids are not the kids who are in love with dressing so I try to make my own sometimes and include them in the process with hopes of sprucing up their plates one day. I’m thrilled that they will eat all of the cut-up vegetables that go into a salad but I dream of the day when I can make a big salad, dress the whole thing and delve it out onto everyone’s plates.


My son helped me with this recipe for Creamy Blue Cheese Dressing by pulsing the ingredients in the food processor. Pressing a button that results in a loud sound is the best thing ever for a little boy. It soon caught the attention of my daughter and her friend and before I knew it they were all taking turns standing on a chair at the counter pressing buttons on the food processor. (I made sure I jumped back and gasped every time they pressed the buttons for more effect which quite possibly added to the appeal.)


I am forever on a search for dressings that taste good and are all natural but not filled with chemicals. They are hard to find. I usually make my own but of course I don’t always have time or all of the ingredients to whip up a fresh batch. When I do, I always wonder why I don’t just always make my own because it really isn’t too difficult and it is typically really good as long as you use good ingredients. My thought process tends to circle back around to doing it myself every time.


Creamy dressing for a lot of us is a splurge, so when we have it, it better be good. Some salads just need a creamy touch and if you don’t drench your salad and omit cheese as a topping, it feels a little healthier. This recipe has a touch of sweetness to it from the agave that helps to counter bitter greens. (Agave has a low glycemic index (www.webmd.com) which makes it a better choice than sugar.). I used the dressing on dandelion greens, which have a very bitter taste, and the light sweetness balanced it out beautifully. I also used a little walnut oil since walnuts go so well with blue cheese, and tarragon went in because it just sounded perfect too. Definitely substitute if you don’t have those specialty ingredients on hand. In other words, you can sub olive oil, for walnut oil and any herb for the tarragon. If you do a dry herb, only add about a teaspoon or so. Try the dressing on raw kale, arugula or even roasted Brussels sprouts. Use it as a dip for vegetables at a party or over grilled meat. There are endless possibilities.


Enjoy!

DSC_0028

Creamy Blue Cheese Dressing

Makes around 2/3 cup

—–

Ingredients:

1 clove garlic

1 teaspoon Dijon mustard

1 teaspoon raw agave syrup

¼ cup loosely packed tarragon leaves

1/3 cup crumbled blue cheese

1/3 cup sour cream

1 tablespoon white wine vinegar

2 tablespoons walnut oil

¼ teaspoon freshly ground black pepper

1/8 teaspoon fine sea salt

—–

Equipment:

Chef’s knife

Cutting board

Measuring cups/spoons

Silicone spatula

Small food processor

Preparation:

DSC_0001 DSC_0002

1. Trim stem end off garlic and lay the flat side of a chef’s knife over top. Smash the knife with the heel of your hand to remove the skin. If there is a green center, remove and discard that portion. Otherwise, toss the garlic in the food processor and pulse 5-10 times or until chopped as small as possible.

2. Add tarragon and pulse a few times to chop.

DSC_0005

3. Add remaining ingredients and pulse until smooth and creamy. Refrigerate until ready to use.

Thai Chicken Noodle Soup

DSC_0039A couple of years ago, I taught a soup and sandwich class for a very large group of students. I knew that I needed to have some familiar things on the menu but I always like to come up with unique takes on the classics when possible. We did prepare very classic sandwiches: Croques Madame and Monsieur. I love throwing a little of my French cooking background into my classes when possible. So much of the French technique teaches basic formulas that can be applied to so many other things, such as Potato-Leek Soup. When you master those formulas, you can become that cook who creates without a recipe.

I really have to try hard to write things down while I’m cooking which is why this blog has been so helpful for me in addition to my “followers”. On more than one occasion I have entertained in my home and have had the luck of making something that my guests have really liked. When they ask for the recipe, I just point to my head and apologize because I have no written recipe and I don’t have a prayer when it comes to replicating the dish.

As for this soup, it is chicken noodle soup with a Thai twist. It marries flavors such as peanut, coconut, cilantro and lime, while subbing out less-healthy egg noodles for gluten-free Pad Thai rice noodles. I typically make my own stock when I make chicken soup. I simmer a whole chicken in water with some mirepoix (pronounced meer-pwa and consisting of carrots, celery and onions) and parsley stems, thyme, peppercorns and leek greens if I have it all (that is my French formula for stock). Let it cook an hour or two, strain it and there is your perfect stock. Unfortunately, I don’t always have that time or the ingredients to pull off a fresh batch so sometimes I cheat and take a good quality store-bought stock or broth and infuse it with a couple of ingredients to enhance its flavor, in this case ginger and cilantro. I first thought of infusing the stock with ginger because I swear that every time I try to grate it on my microplane grater, I manage to take off some skin-my own skin. This just seemed a whole lot easier and produced amazing results.

The recipe is gluten free and dairy free for those of you who care. A little Sriracha (Thai hot sauce) goes really well with the soup but I put that down as optional since not everyone likes hot sauce. I highly recommend the shredded coconut and chopped peanuts as a garnish too because they really boost the flavor. Some people like a few noodles in their soup, and some like a lot (that’s me!) so you have the freedom to add anywhere between a quarter and a half pound depending on what you like. If you choose a half a pound, you will have more of a noodle dish the next day as leftovers which, to me, is not such a bad thing. Enjoy!

—–

Thai Chicken Noodle Soup

Gluten Free / Dairy Free

Serves 8

—–

Ingredients:
2 quarts gluten-free, low-sodium chicken broth
¼ cup sliced ginger, rinsed before cutting, skin left on
15 sprigs cilantro, rinsed
½ cup shredded coconut
½ cup chopped peanuts
½ pound shiitake mushrooms, stems removed and sliced
2 tablespoons canola oil
1 clove garlic, chopped
2 skinless, boneless chicken breasts, cut into small pieces
½ teaspoon turmeric
¼ teaspoon cayenne pepper
¼ cup creamy, all-natural peanut butter
¼ cup fresh lime juice
¼-½ pound Pad Thai rice noodles (for a more noodley soup add ½ lb.)
¼ cup sliced scallions
½ cup cilantro leaves, rinsed
13.5-ounce can lite coconut milk
Salt and pepper to taste
Sriracha sauce (optional)

—–

Equipment:

Medium saucepan
Measuring cups/spoons
Cutting board
Chef’s knife
Paring knife
Small non-stick skillet
Wooden spoons
Food processor (helpful)
Large pot
Sealed plastic bag
Meat mallet or large spoon
Can opener

Preparation:

DSC_0001

1. Infuse the chicken broth: Place the broth in a medium saucepan and add the ginger slices and cilantro sprigs. Bring to a boil over medium-high heat and then reduce to medium heat. Simmer for 30 minutes while preparing the rest of the soup.

DSC_0015 DSC_0016

2. Prepare the garnishes: Place shredded coconut in a small non-stick skillet over medium heat and toast until golden brown, stirring frequently, 5-7 minutes. Set aside. Pulse the peanuts in a food processor until they are crumbly. Alternatively, gently chop with a large chef’s knife until crumbly. Set aside.

DSC_0002 DSC_0003 DSC_0006 DSC_0007 DSC_0008 DSC_0009 DSC_0010 DSC_0011 DSC_0012 DSC_0013

3. Heat oil in a large pot over medium heat. Cook garlic for 30 seconds and add chicken. Cook for 5-7 minutes more, or until chicken shows no signs of pink on the outside. Add turmeric and cayenne and stir to coat. Add mushrooms and cook until softened, around 5 minutes. Strain stock into pot and stir in peanut butter and lime juice. Stir to combine and bring to a simmer.

DSC_0014 DSC_0020 DSC_0022

4. Meanwhile, place noodles in a sealed plastic bag and with the EDGE of a meat mallet or big spoon, strike the noodles until they break into pieces. Add noodles to the soup and cook for around 10 minutes, or until tender. Remove from heat and stir in coconut milk.

DSC_0023 DSC_0024

5. Add scallions and cilantro leaves. Season with salt and pepper to taste.

DSC_0031

6. Ladle soup into bowls and garnish with coconut, peanuts and optional Sriracha.

GLUTEN-FREE Brazilian Cheese Rolls

DSC_0072I have been away from posting and very busy doing some great things to my blog. First, I have made my recipes much more clean and searchable.  I am not all that technical nowadays so it took me a long time to figure this one out and at least a week of squeezing in the fixes until I managed to get everything cleaned up on my site. That’s the thing about us real moms, we have very little time, if any, to get things done and we squeeze things in all the time. I think my blog is definitely a “squeeze-it-in” kind of project that I have fallen in love with. I have loved all of the feedback I have received so thanks to those moms, dads, grandparents and other cooks alike for your comments. It keeps me posting!

The second thing I have been busy doing, which has caused me a great sense of triumph, and guilt at the same time, is developing a recipe for Gluten-Free Brazilian Cheese Rolls. I had never heard of them before until I was at a camera shop in an odd part of Richmond that is outside of my typical, day-to-day zone. Sometimes I feel like my life is zoned with the contents being the regular stores at which I shop, the locations of my kids’ activities and a smattering of places I try to go to here and there for old times’ sake.

Now back to my guilt. It all started when my new labradoodle puppy destroyed my camera cord. She chewed it up like it was a rawhide while hiding behind an ottoman. It was one of many naughty things she has done since Santa delivered her. I went to the only camera shop in town that claimed to have a replacement cord. I needed it fast so I could post pictures to the blog. When I left the shop, I noticed a sign that read something like: “Home of the Famous Brazilian Cheese Rolls This Way->”. My curiosity got the best of me so I went down this nothing of an alley and into the tiniest shop I have ever seen. The only things for sale were the rolls, a flan ring (just one) and soda. The man who I assumed to be the owner of this shop was from Sao Paolo, Brazil-I had to learn where he was from since I have good friends who live in Sao Paolo at the moment. He offered me one of his hot rolls which literally melted in my mouth they were so good. They were dense and chewy, yet full of little air pockets, and very flavorful. I had to buy some. Right before I left, he said, “Oh, the interesting thing about these rolls is they are gluten free.” That really sparked my interest since I have close relatives who don’t/can’t eat gluten. I went to visit the shop several more times but it really was a haul for me. That is when I decided that I needed to figure out my own recipe-hence the research began. I think I made them every day last week, at least once a day, until I felt I had achieved a great result.

These rolls are so good but the trick is to get the right texture of the dough which is easy to do with practice. In case you have a kitchen scale, I have included the weight of the flour which is quite helpful to achieve consistent results. During one of my attempts my dough was too wet and I had pancakes come out of the oven. There is no yeast so all of the rising comes from the beaten eggs that are incorporated into the recipe. Too wet = too flat. You should be able to shape the dough into little balls wwithout it spreading out. Basically, you want the dough to be a little sticky but easy to handle with oiled hands.

Tapioca flour is used (every recipe I saw used tapioca flour which lead me to believe that that is the traditional starch that is used) and it can be found either in the specialty flour section of a grocery store or for a lot less, at an Asian food market.

If you are gluten free, or not, definitely try these rolls. They take at most 15 minutes to prepare and only 25 minutes to bake. And if you find yourself in the West End of Richmond just west of Parham on Patterson, pop in and give this nice man some business to relieve my guilt. Otherwise, save a little time and money and try this recipe at home.

—–

Brazilian Cheese Rolls

Makes 1 dozen

—–

Ingredients:

3 cups tapioca (400 g)

½ cup whole milk

¼ cup extra-virgin olive oil, plus 1 tablespoon for oiling hands

¼ cup water

1 ½ teaspoons Kosher salt

2 eggs, lightly beaten

1 cup shredded mozzarella cheese

¼ cup grated parmesan cheese

—–

Equipment:

Measuring spoons/cups

Kitchen scale-highly recommended

Silicone spatula

Small saucepan

Stand or hand mixer

Small bowl

Cookie sheet

Parchment paper

Preparation:

1. Preheat oven to 400 degrees. Line a cookie sheet with parchment paper and set aside.

DSC_0057

2. Place tapioca flour in the bowl of a stand mixer or in a large bowl if using a hand mixer.

DSC_0056 DSC_0058 DSC_0060 DSC_0061 DSC_0063

3. Place milk, oil, water and salt in a small saucepan over medium heat. Bring to a boil and pour over the tapioca flour. Mix with the paddle attachment (or hand mixer if using) until smooth. Add the cheeses and mix to combine.

DSC_0064 DSC_0065

4. Add egg and beat well until the dough is shiny and homogenous but SLIGHTLY sticky to the touch. If it is too dry, add water one teaspoon at a time, beating well after each addition. If too wet, add tapioca flour one tablespoon at a time until it is slightly sticky to the touch.

DSC_0068

5. Lightly oil your hands and a ¼-cup measuring cup with reserved oil and press a piece of the dough into the measuring cup. Drop the dough into your hands and shape it into a ball and then place it on the cookie sheet. It should hold its shape. (If the dough spreads, it is too wet and you should return the dough to the bowl and add more flour until it is a little sticky.) Repeat with remaining dough, using the first ball as a benchmark for size, and place them at least 1 inch apart on the baking sheet.

DSC_0072

6. Bake for approximately 25 minutes, rotating the pan 180 degrees halfway through baking. They are done when they become a light-golden brown and get form freckles on the surface. Let cool a little and eat warm. Will last up to a day.

Winter Shrimp Tacos

DSC_0035I know, I know…it’s a little early for shrimp tacos. They are completely a spring/summer dish but avocados are just so good right now. I suppose a lot of people were making guacamole for the Super Bowl-great game by the way-and now that it’s over, they’re all on sale. Shrimp Tacos it is!

I wanted to make the tacos a little more hardy and healthy so I incorporated a few things into the dish: soft whole grain tortillas and arugula (a robust lettuce with a peppery note). Most lettuce will do but I liked this one because it packed the dish with more nutrients (calcium, vitamins A, C and K (source: www.livestrong.com)). If you can’t find it at the store or find it too strong, try a spring mix. Skip the iceberg though-to me it’s kind of a pointless lettuce.

The funny thing about shrimp is it is typically frozen soon after it’s caught so sometimes the ones in the freezer section are the same as the ones in the “fresh” case. I would rather buy shrimp from a reputable source that is frozen than a sketchy one that is selling it as “fresh”. You can always refer to www.fishonline.org for more guidance on which shrimp (sometimes labeled as prawns) are sustainable or okay to eat. If in doubt, I try to buy local or USA caught/raised. Also, if cleaning them seems daunting or too time consuming, spend a few dollars more and buy them pre-cleaned.

The dressing and spice mixture can be made ahead. These are also great as leftovers or for lunch the next day. Enjoy this winter-spring-summer dish!

—–

Shrimp Tacos

Makes enough for 4 tacos

—–

Ingredients:

Chili-Spice Mixture

½ teaspoon chili powder

½ teaspoon ground coriander

¼ teaspoon paprika

¼ teaspoon ground mustard

¼ teaspoon fine sea salt

1/8 teaspoon cumin

1/8 teaspoon ground black pepper

Chili-Spiced Shrimp

1 pound shrimp, cleaned

Chili-Spice Mixture (ingredients above)

1 clove garlic, chopped or minced

1 tablespoon extra-virgin olive oil

1 tablespoon fresh lime juice

 Cilantro-Lime Dressing

1 clove garlic

Zest of 1 lime

½ cup cilantro (good handful of leaves)

½ teaspoon chili powder

½ teaspoon fine sea salt

¼ teaspoon ground black pepper

2 tablespoons fresh lime juice

1 tablespoon cold water

¼ cup extra-virgin olive oil

¼ cup sour cream

Tacos

4 soft whole grain tortillas

1 recipe for Chili-Spiced Shrimp

1 recipe for Cilantro-Lime Dressing

2 cups arugula lettuce (or spring mix)

1 avocado

½ cup black beans, rinsed

½ cup shredded cheddar cheese (optional)

—–

Equipment:

Small container with tight-fitting lid

Medium bowl

Silicone spatula

Small food processor

Cutting board

Paring knife

Chef’s knife

Spoon

Hand strainer

Small food processor

Zester

Large-nonstick sauté pan

Wooden/bamboo spoon

Aluminum foil

Preparation:

1. Preheat oven to 375 degrees.

2. In a small container with a tight-fitting lid, add ingredients for Chili-Spice Mixture and shake to combine.

DSC_0015

3. Place shrimp, Chili-Spice Mixture, garlic, oil and lime juice in a medium bowl, toss to combine with a silicone spatula, cover and refrigerate for at least 15 minutes and up to 30 minutes.

DSC_0016 DSC_0018 DSC_0020 DSC_0022

4. Meanwhile, make the Cilantro-Lime Dressing. Place garlic in a small food processor. Pulse to chop. Add zest and cilantro and pulse to chop. Add spices, lime juice and water and pulse a few times to combine. Add oil and sour cream and pulse until emulsified (Vocabulary: To emulsify means to blend the liquids together until they form a unified dressing. In this case, the sour cream is the emulsifying component. Mustard works too if making other dressings.). Refrigerate until ready to use.

DSC_0025 DSC_0027 DSC_0028

5. Slice the avocados. (Technique: Make a cut from top to bottom. You will feel the knife touch the pit in the center as you cut. Unscrew the halves so they separate. The round pit will remain in one half. Pull this out. Take a paring knife and make even slices in each half of the avocado, taking care to just slice until you hit the skin while not cutting through the skin. Take a regular spoon and slide it between the flesh and the skin in a back and forth motion to remove the slices. Set aside. Try to do this at the last minute so the avocado doesn’t brown.)

DSC_0029 DSC_0030

6. Before you take the shrimp out of the refrigerator, wrap the tortillas in aluminum foil and set in the oven for 15 minutes. Turn the oven off but leave them in until ready to eat. When shrimp is done marinating, remove from refrigerator and heat a large-nonstick sauté pan over medium-high heat. Add shrimp and toss with a wooden/bamboo spoon constantly until all of the shrimp are just cooked through. It shouldn’t take more than 2 minutes. Set aside.

DSC_0031DSC_0035

7. To assemble, lay a warm tortilla on your plate. Top it with some arugula, then shrimp, then avocado, then dressing and finally, sprinkle beans on top and cheese (if using). Roll and enjoy.

Strawberries and Cream

DSC_0011Healthy desserts are not typically my thing. I believe in scratching the itch instead of going around it and around it and never hitting the spot. I don’t splurge every day but if I do, I want to be satisfied. However, since my blog is all about doing things a little healthier, I will try my best to be creative and throw a few things out there that are better for you in the land of sweets.

This dessert can also be a yummy after-school snack. I can’t lie and say that I never give my kids cookies and sweets when they get home from school. Of course I do sometimes. A little dessert therapy can make the worst day a lot better! However, I also give them chopped up veggies and fruit so they understand that they can have those things some of the time but not all of the time. It seems to work for us.

When I worked at Mesa Grill, we made strawberry shortcake (it sounds so ordinary but believe me, everything that went into it made it far from ordinary). One of the elements that stuck with me was the use of sour cream in the whipped cream that accompanied the strawberries. The sour cream and heavy cream were whipped together with nothing else. It was so simple and so delicious with the other elements in the dessert. I applied the altered whipped cream technique to my Strawberries and Cream recipe. Instead of sour cream, I used 2% Greek yogurt since it has such healthful elements like less sugar and more protein than regular yogurt and it also has probiotics which heavy cream does not. I really do not like fat free Greek yogurt but if you don’t mind it feel free to use that instead of the 2% yogurt. I did a little math and figured out that by using the 2% Greek yogurt, the fat was cut almost in half and the calories were cut by about 40%. If it tasted bad I would never do it but trust me, it’s really good as evidenced by the dishes below. This one was devoured by my kids (and me too):

DSC_0013

If you want to go a step further and use this for a dinner-party dessert, try it with pound cake or angel food cake. There’s your splurge.

Enjoy!

 —–

Strawberries and Cream

Serves 4

 —–

Ingredients:

2-3 cups of strawberries (can use any other berry or soft fruit like peaches)

½ cup 2% Greek Yogurt

½ cup heavy whipping cream

1 teaspoon agave nectar

1 teaspoon vanilla extract

—–

Equipment:

Cutting board

Paring knife

4 individual dessert dishes or ramekins or small bowls

Stand mixer with whip attachment or medium bowl with hand mixer (or whisk if you want to work your arm)

Silicone spatula

Preparation:

DSC_0007

1. Remove stems from strawberries and cut into slices or quarters. Place in 4 small dessert dishes or bowls.

DSC_0001 DSC_0003 DSC_0004 DSC_0005DSC_0008 DSC_0011

2. Place remaining ingredients in the bowl of a stand mixer with the whip attachment or in a medium bowl if using a hand mixer (or whisk). Whip for one minute, turn the mixer off and scrape the bowl with a silicone spatula. Continue to whip until thick and peaks form when the whip/mixer is lifted from the bowl. Scoop over strawberries and serve immediately.

Basic Pork Loin, Sauteed Lacinato Kale and Quinoa Cakes

DSC_0183Sometimes we all need to get back to the basics of cooking. The point of my recipes today is to teach you about knowing when food is done. It is really hard to give an exact cooking time for anything because every stove and oven are different and can vary tremendously from one to the next. That is why with practice, you should know if your oven runs hot, where the hot spot is (they all have one which is why I like to rotate things half way through cooking for more even cooking) and what things look and feel like when they have achieved perfection. I can teach you the basics of cooking but you need to pay attention as much as you can with all of the distractions that surround you. I can’t tell you how many times I have overcooked or burned things because I got caught doing things like changing an explosive diaper or mediating a conflict-whatever comes my way on a day-to-day basis.

If you follow recipes to a T and things tend to overcook all the time, your oven runs hot. If things take twice as long to cook, the opposite is true. That is why I give a time approximation or range and a description of how to know when things are done. Nothing is worse than a recipe for, let’s say, a piece of meat that gives you an exact cooking time. You are doomed to over- or undercook it because there are so many things that go into the cooking time like weight of meat and oven personality. You just need to practice and know when done is done.

I remember the first time I got yelled at when I worked at Mesa Grill (so many chefs like to yell). I made the mistake of asking the Executive Pastry Chef how long it took to cook something. It was so long ago I can’t even remember what I was cooking. Instead of making it a teaching moment for her new pastry cook, the chef fired back at me with sharp eyes and a heated lecture on why you can’t ever give an exact time. (It was quite ironic that she had us cook her mini cheesecakes for 5 minutes and 45 seconds. I chose to not test my luck and my job by bringing that point up.) I did learn a couple of valuable lessons from that “teaching” moment though:

One: Learn how to tell when food is done.

Two: Don’t ever ask how long it takes to cook things!

I had no idea at the time how valuable my experiences were in the NYC kitchens but now I appreciate them so much which is why I feel destined to share my knowledge.

The first recipe is for a Basic Roasted Pork Loin. I have already posted a recipe for a pork loin but this one is much simpler. Three ingredients and that’s it. I am not a huge fan of blended dried herbs (I’d rather use fresh) but in the middle of the winter, it is much cheaper, and easier, to use something out of a jar. Just make sure whatever herb/spice blend you use is a good one! You do need a meat thermometer which is something anyone who cooks should have. To tell if it is calibrated correctly, put it in a glass of ice water for 5 minutes and see if it reads 32 degrees. If not, add or subtract the inconsistency when using it. The meat starts in a very hot oven to facilitate browning and then finishes in a moderate oven for even cooking. Just keep your eye on it at the end to make sure it doesn’t overcook.

To accompany the pork, I made Sautéed Lacinato Kale. Again, few ingredients but delicious. Just be sure to check it and stir it frequently because if overcooked, it becomes a horrible shade of blasé green and loses flavor. Also, I like to season greens at the end of the cooking process because they shrink down so much and you don’t want to overdo it. I accidentally dumped a ton of salt on the kale and had to throw some of the top leaves away (You can probably see it in the last picture of the kale in the pan!). I was being lazy and should have known better than to pour salt directly from the container. Shame on me!

The last dish I made was Quinoa Cakes. This is my most basic recipe. I often switch it up by adding diced or roasted peppers, pureed beets, different kinds of cheeses, or whatever I can think of to make it take on more flavor. I bake them in the oven because they tend to fall apart if sautéed. Eggs are used to bind them but if you can’t, or don’t, do eggs, just leave them out and don’t form cakes, which means you don’t bake anything at the end either. If you do make the cakes, only cook them until they just become a solid mass. They make excellent leftovers and are a great grab-and-go breakfast as they are loaded with protein and fiber and won’t give you a mid-morning sugar crash. My 3-year old thought it was bread and I didn’t correct him since he ate it. This left me speechless since he is normally so discerning about what goes in his mouth. Hey, whatever it takes!

Please recreate this simple meal and let me know what you think. Bon appétit!

—–

Basic Roasted Pork Loin

Serves 4-6

DSC_0160

Ingredients:

2-2.5 pound pork loin

2 tablespoons extra-virgin olive oil, divided

2 tablespoons Italian (or other favorite) seasoning or spice blend

—–

Equipment:

Medium sauté pan

Measuring spoons

Meat thermometer

Preparation:

1. Remove meat from refrigerator and let sit at room temperature up to one hour before cooking. Preheat oven to 450 degrees.

DSC_0134 DSC_0136 DSC_0137 DSC_0138

2. Pour 1 tablespoon oil in sauté pan and roll pork in oil to coat. Rub spice blend all over pork. Place remaining oil in pan, underneath pork loin, and make sure the meat is fat-side up if there is a layer of fat on one side.

DSC_0157 DSC_0158

3. Place in oven and roast for 15 minutes at 450 degrees. Turn oven down to 350 degrees and roast 30-45 minutes more (times will vary depending on weight of meat and oven) until an instant-read meat thermometer reads 150-155 degrees. 150 is perfection but 155 will do if you don’t like slightly pink meat in the middle. Remember, pork is safe after 138 degrees. Rest 10-15 minutes, slice on the bias (Vocabulary: BIAS means diagonal in the food world.) for more tender meat and serve.

—–

Sautéed Lacinato Kale

Serves 4

DSC_0167

Ingredients:

2 tablespoons extra-virgin olive oil

½ onion, sliced

1 bunch lacinato kale, leaves removed, stems discarded

¼ cup white wine, such as pinot grigio

Salt and pepper to taste

Equipment:

Cutting board

Chef’s knife

Measuring cups/spoons

Large sauté pan with cover

Preparation:

DSC_0151 DSC_0153

1. Heat large sauté pan over medium heat. Add oil and then onions. Sweat (Vocabulary: SWEAT means to cook vegetables until softened and without browning.) onions for 5-7 minutes, or until translucent.

DSC_0154 DSC_0155 DSC_0163

2. Add kale leaves to onions and stir. Pour in wine and cover. Cook 5-7 minutes, stirring occasionally, or until kale begins to soften. Remove from heat, season with salt and pepper and serve.

—–

Quinoa Cakes

Makes 10 small cakes

DSC_0184

Ingredients:

 1 ½ cups quinoa (red or white)

2 ¼ cups water

1 teaspoon fine sea salt

Cooking spray

1 15-oz. can black beans, drained and rinsed

4 eggs, lightly beaten

½ cup packed shredded Parmigiano-Reggiano cheese

½ teaspoon ground black pepper

—–

Equipment:

Medium pot with lid

Large bowl

Silicone spatula

2 small bowls

Potato mashers

Measuring cups/spoons

Large baking sheet

Aluminum foil

Preparation:

1. Preheat oven to 425 degrees.

DSC_0140 DSC_0141 DSC_0142

2. Bring quinoa, water and salt to a boil. Reduce heat to medium-low, cover and cook for 18 minutes (all moisture should be evaporated). Let cool at least 20 minutes.

DSC_0143 DSC_0145

3. Meanwhile, line a baking sheet with aluminum foil and spray with cooking spray. Mash black beans with a potato masher until they begin to burst and add to quinoa along with remaining ingredients for the cakes.

DSC_0147 DSC_0162

4. With a ½-cup measuring cup or ramekin, form quinoa into 10 cakes. Flatten so they stand 1 inch tall and bake around 15 minutes, or until they just become firm and are a light golden color.

Cheddar-Beer Dip with Soft Pretzels & Potato-Leek Soup

**The following recipes were posted on my former blog site this past fall. I thought they would make great football fare for this weekend.**

DSC_0621 DSC_0597

My next set of recipes is perfect for this time of year. A little something for the parents, a little something for the kids and a lot of something that has to do with fall.

I had the pleasure of seeing my alma mater take down a big rival in football yesterday (Go Spiders!). We hosted a tailgate, with two other couples, that was attended by 50, maybe 60, people, ages ranging from newborn to 50 something. It was sunny and 70 degrees and all in all, a perfect day. The husbands wanted to be in charge of this one which was fine by me. The theme they settled on: Oktoberfest. German beer, brats, and German chocolate. Well, not exactly German chocolate-more like American chocolate, and all different kinds. Pretty much a giant Halloween sampler. They don’t get to do the shopping often so they are literally like kids in a candy store when presented with temptation. Everyone loved what they bought so they did well. As for my contribution to the workload, naturally I offered to make whatever they wanted. It had to be easy to serve and of course, within the theme.

The first I came up with, which is one of my favorite fall snacks, was homemade pretzels. I typically come up with my own recipes but like everyone else who cooks, when I find a good one I don’t make changes, or at least not many! The one I have used, time and time again, is by Alton Brown. His recipe makes 8 big knotted pretzels which wouldn’t work very well for a crowd because I would have to make ten times the recipe. My smart husband said, “Why don’t you make pretzel bites?” So simple. I doubled the recipe, and 200 bites later, I was all set. Kids and adults both gobbled them up.

I usually make a dipping sauce to go with the pretzels that is quick and easy and always good-I mix equal parts mayonnaise and whole grain mustard and then stir in a little honey. If I want a kick, I add a little Dijon. It’s also a great spread for sandwiches if there are leftovers. Although that one is safe and easy, I felt like for a themed tailgate, I needed to step it up a notch so I created something that any man would love: a beer béchamel with sharp cheddar. It’s like a Frenchman meets a German lady in a bar in Wisconsin. What exactly is a beer béchamel with sharp cheddar? Translation: Cheddar Beer Dip. It was fantastic with the pretzels.

Another fall favorite of mine is Potato Soup. It’s actually Potato-LEEK Soup which is not exactly German but I was sure nobody would notice. It is derived from a very classic recipe that I learned in school. The nice thing about it is you can apply the technique to many different kinds of soup. I thought I would share the recipe since it was such a big hit at the tailgate.

Bon appétit!

—–

 ***The following recipe for Homemade Soft Pretzels was borrowed from the Food Network website. This is what I changed to make the pretzels crowd friendly:

-Preheat oven to 500 degrees.

-Roll each of the 8 dough pieces into 15″ ropes and cut into 1″ pieces. Boil in the same way and bake for 8-10 minutes, or until dark golden brown.

Homemade Soft PretzelsRecipe courtesy Alton Brown, 2007

Ingredients

  • 1 1/2 cups warm (110 to 115 degrees F) water
  • 1 tablespoon sugar
  • 2 teaspoons kosher salt
  • 1 package active dry yeast
  • 22 ounces all-purpose flour, approximately 4 1/2 cups
  • 2 ounces unsalted butter, melted
  • Vegetable oil, for pan
  • 10 cups water
  • 2/3 cup baking soda
  • 1 large egg yolk beaten with 1 tablespoon water
  • Pretzel salt

Directions

Combine the water, sugar and kosher salt in the bowl of a stand mixer and sprinkle the yeast on top. Allow to sit for 5 minutes or until the mixture begins to foam. Add the flour and butter and, using the dough hook attachment, mix on low speed until well combined. Change to medium speed and knead until the dough is smooth and pulls away from the side of the bowl, approximately 4 to 5 minutes. Remove the dough from the bowl, clean the bowl and then oil it well with vegetable oil. Return the dough to the bowl, cover with plastic wrap and sit in a warm place for approximately 50 to 55 minutes or until the dough has doubled in size.

Preheat the oven to 450 degrees F. Line 2 half-sheet pans with parchment paper and lightly brush with the vegetable oil. Set aside.

Bring the 10 cups of water and the baking soda to a rolling boil in an 8-quart saucepan or roasting pan.

In the meantime, turn the dough out onto a slightly oiled work surface and divide into 8 equal pieces. Roll out each piece of dough into a 24-inch rope. Make a U-shape with the rope, holding the ends of the rope, cross them over each other and press onto the bottom of the U in order to form the shape of a pretzel. Place onto the parchment-lined half sheet pan.

Place the pretzels into the boiling water, 1 by 1, for 30 seconds. Remove them from the water using a large flat spatula. Return to the half sheet pan, brush the top of each pretzel with the beaten egg yolk and water mixture and sprinkle with the pretzel salt. Bake until dark golden brown in color, approximately 12 to 14 minutes. Transfer to a cooling rack for at least 5 minutes before serving.

©Television Food Network G.P.

All Rights Reserved.

—–

Cheddar-Beer Dipping Sauce

Makes Around 3 Cups

DSC_0621Ingredients:

2 tablespoons unsalted butter

2 tablespoons all-purpose flour

12-ounce bottle heavy beer

1 tablespoon Dijon mustard

3 cups shredded sharp cheddar

—–

Equipment:

Small saucepan

Small whisk

Wooden spoon

Preparation:

DSC_0605

1. Make a roux (pronounced: rue): Place the butter in the saucepan and then turn up the heat to medium. Once melted, whisk in flour. Cook for 1 minute (will be pale in color).

DSC_0605 DSC_0608 DSC_0614

2. Add beer, whisking to combine. Whisk occasionally, until the mixture begins to simmer and thicken, around 10 minutes. Remove from heat and stir in the cheese and mustard with a spoon. Season to taste with salt and pepper and serve warm.

—–

Potato-Leek Soup

Serves 6-8

*Gluten Free*

DSC_0597Ingredients:

2 T extra virgin olive oil

1 medium onion, chopped

3 small or 2 large leeks

2 quarts gluten-free, low-sodium chicken broth or stock

1 pound potato

Salt and pepper to taste

2 tablespoons chopped herbs such as chives, chervil or tarragon (optional)

Sour cream or crème fraiche for serving (optional)

—–

Equipment:

Cutting board

Chef’s knife

Wooden spoon

Peeler

Immersion Blender or regular blender

Preparation:

1. Slice and clean leeks (Technique: Hold root end of leek. Over a trash can or sink, with a large chef’s knife, hack off the dark green parts. It is as if you are shaving them off in a downward motion, turning the leek as you circle around it. This will preserve the light green part underneath. If you just chop off the dark green part in one cut, you will lose everything underneath. Discard dark green leaves and slice the leek in half, lengthwise, going right through the middle of the root so it stays intact. Slice leek from the opposite end of the root, working your way toward the root. Place all slices in a large bowl. Fill with cold water, swish leeks around with your hand to release the dirt and scoop out the leeks, placing them into another large bowl. The dirt will remain at the bottom of the bowl so rinse the bowl out before using again. Repeat 1-2 more times, until you get a dirt-free bowl.) Place leeks in a strainer and shake dry. *Do not pour leeks out into a strainer because if there is dirt at the bottom of the bowl it will go with the leeks*.

DSC_0572

2. Heat large pot over medium heat. Add oil when hot.

DSC_0573 DSC_0576 DSC_0578

3. Add onions and leeks and stir occasionally until the leeks are very limp and have shrunk down, around 30 minutes.

DSC_0579

4. Pour in broth or stock and increase heat to medium-high. Once it comes to a boil, immediately reduce heat to a simmer (medium or medium-low).

DSC_0585 DSC_0588 DSC_0590
5. Once the broth or stock is in the pot, peel the potato and cut it into chunks. (Technique: It is important to wait because the potato will discolor if it is not in a liquid. If you must peel and/or cut it earlier, place it in a bowl of cold water to keep it white.)
6. Cook until the potato pieces are very soft and will mash apart easily when a wooden spoon presses them against the pot, around 45 minutes.
DSC_0594 DSC_0581
7. Purée with an immersion blender or place in a regular blender in batches (Technique: DO NOT fill a blender with a HOT liquid more than ¾’s because the pressure will make the top explode and can result in burns. This is kind of important!)
8. Season with salt and pepper and add herbs if using. Ladle into bowl, dollop with sour cream or crème fraiche, if using, and serve.

Brussels Sprouts for People Who Don’t Eat Brussels Sprouts

DSC_0228

I like to call this recipe: Brussels Sprouts for People Who Don’t Eat Brussels Sprouts. I personally love them but for some, the mere sight of Brussels sprouts can result in a body quiver. What do you do for those people? You change its appearance and make it unrecognizable. I trimmed them up, as you should by pulling off the outer leaves and trimming the stem ends, and shredded them in a food processor. Then I created a marriage of senses on your tongue that will make you forget what it is that may have turned you off of Brussels sprouts in the first place:

Sweet…Check (Agave)

Salty…Check (Cheese)

Sour…Check (Sour Cream)

Bitter…Check (Brussels Sprouts)

By adding a touch of sweetness from the agave, the mild bitterness of the Brussels sprouts disappears. The sour cream gives it a nice texture and enhances all of the flavors and the saltiness of the cheese, well that just makes it taste better. My oldest daughter ate hers up (okay, I promised her the last frozen yogurt pop in the freezer if she finished it) and there was no gagging which made me feel good. The two younger ones, well, they did what I expected: a try it bite and that was that. I try to have realistic expectations with vegetables and know that the really strong ones take time for people, namely kids, to like, but I really think the more exposure they get to different flavors, the more likely they are to change their tune down the road. It’s all about trying new things.

To all of you Brussels sprouts doubters out there: try this recipe!

—–

Brussels Sprouts for People Who Don’t Eat Brussels Sprouts

Serves 6

*Gluten Free*

 —–

Ingredients:

1 tablespoon extra-virgin olive oil

1 pound Brussels sprouts

2 egg whites

¼ cup of sour cream

5 tablespoons grated parmesan cheese, divided

1 teaspoon agave nectar

½ teaspoon cinnamon

¼ teaspoon freshly grated nutmeg

½ teaspoon fine sea salt

½ teaspoon freshly ground black pepper

—–

Equipment:

Small baking dish or pie plate

Silicone brush or paper towel for oiling dish

Cutting board

Paring knife

Food processor

Large bowl

Small bowl

Fork

Measuring cups/spoons

Silicone spatula for mixing

Preparation:

1. Preheat oven to 400 degrees. Brush a small baking dish or pie plate with oil and set aside.

DSC_0207 DSC_0208 DSC_0209 DSC_0210

2. Remove outer leaves of Brussels sprouts and trim stems. Place in a food processor and pulse 10 to 12 times until they are shredded. Dump into a large bowl and re-pulse any whole ones that did not shred. Add to bowl.

DSC_0220

Fresh Nutmeg with Nutmeg Grater

DSC_0212 DSC_0213 DSC_0214 DSC_0215 DSC_0216 DSC_0218 DSC_0224

3. In a small bowl, vigorously whisk egg whites with a fork until foamy. Whisk in sour cream, 3 tablespoons parmesan cheese, agave and spices. Pour into shredded Brussels sprouts and mix to combine. Spread into oiled dish, sprinkle remaining 2 tablespoons cheese evenly over Brussels sprouts and bake for 20-30 minutes (times will vary depending on oven).When the cheese begins to brown, it’s done.

Ricotta Gnocchi with Sauteed Mushrooms and Tomatoes

DSC_0205Before I went to culinary school, at least 10 years ago, I learned how to make gnocchi (pronounced: no-key), which is a potato-based pasta. I was sitting around one day watching the Food Network, a luxury I have long since forgotten about, and Mario Batali was cooking for his show, of which I cannot remember the name. It was the one where he had 3 or 4 people sitting at a counter whose only jobs were to ooh and ah over his cooking and close their eyes and say, “Mmmmm!” as they savored every bite of what he cooked. Was it “Mario Eats Italy”? I can’t remember. One day, he took a baked potato, put it through a ricer (looks like a giant garlic press) and mixed the riced potato flesh with an egg, all-purpose flour, and probably some salt. It didn’t look too hard to me so I tried it and after a bit of practice, I figured out the right constancy of the dough to make perfect gnocchi.

I still make it all the time and switch it up occasionally by adding pureed vegetables, like zucchini or spinach, or swapping out the baking potato for a sweet potato. A few years ago when I was receiving produce from a local coop, I had purple sweet potatoes nestled neatly in my box. Let me tell you, after turning them into gnocchi, which became a beautiful shade of purple, the water that was left in the pot that I boiled them in was the most amazing shade of indigo I have ever seen. I should have grabbed a white t-shirt and made an all-natural tie die or dyed eggs or something because I have never before seen a color so striking and rich. When it comes to vegetables, richness in color often means added nutrients. Orange-fleshed sweet potatoes are rich in beta carotene, vitamins A and C, manganese, fiber and antioxidants (source: www.ncsweetpotatoes.com). The purple ones have an oversupply of vitamin A (source: www.livestrong.com).

Gnocchi is one of those things that I think everyone should learn to make. It can be a little tricky figuring out the right consistency but with practice, you’ll get the hang of it and it is a quick dish to make. Traditionally it has grooves in it which can be achieved by rolling the dough pieces along the tines of a fork but I skip this step to save time. I went to an amazing restaurant in Philadelphia a few years ago and theirs didn’t have grooves which confirmed for me that it is okay to omit this step. I made this gnocchi with ricotta cheese instead of a potato because it is a more consistent material to work with. If you stick with the same brand than you will know exactly how much flour you will need the second time you make it. A drier ricotta will use less flour than a wet one so start with 1 ¾ cups of flour and add more as needed. You shouldn’t need more than 2 ¼ cups. Just break off a piece and try to roll it like you did in the old days with play dough and if it’s too wet, it won’t roll so knead more flour into the dough. If it rolls easily and is still a little soft, you’ve reached gnocchi perfection. After you have mastered the dough for the ricotta, move on to potato gnocchi and start getting creative.

If you have time to make your gnocchi in advance, I like to freeze mine because you can guarantee the pieces won’t stick to each other. Even if they are touching a little you can snap them apart. Once frozen, put them in a freezer bag to save for a later date.

My kids have been eating gnocchi since they learned how to chew and my secret is keeping it kid friendly by not making it too weird for them. The dish below has a mushroom sauté to mix with the gnocchi so if you don’t think your kids will go for the mushrooms, set aside half of the gnocchi and cut the mushroom mixture in half. Theirs can be coated with a little extra virgin olive oil or butter and grated parmesan, parmigiano-reggiano, romano or asiago cheese (or any combination of the cheeses).

The key to mastering gnocchi (and all cooking of course) is practice, practice, practice!

—–

Ricotta Gnocchi

Serves 8 as a side or 4 as a main dish

 —–

Ingredients:

15 oz. container of whole milk ricotta

1 large egg

1 ¾-2 ¼ cups all-purpose flour, plus ¼ cup for rolling and coating

¼ teaspoon kosher salt

 —–

Equipment:

Large wide pot

Large bowl

Silicone spatula

Small bowl

Fork

Measuring cups/spoons

Small bowl

Bench scraper

Rimmed-cookie sheet or large-baking dish

Waxed paper

Preparation:

1. Bring a large pot of water to a boil. (Technique: Use a wide pot so the gnocchi doesn’t clump. If the pieces can’t spread out they will pile up on top of each other and stick together.)

DSC_0178 DSC_0181

2. Meanwhile, scrape ricotta into the large bowl with a silicone spatula. Lightly beat egg with a fork and add to ricotta along with 1 ¾ cups of flour and salt. Use your hand to combine everything and knead until a homogenous dough is formed. (Technique: Flatten dough with the heel of your hand, fold the dough over, give a quarter turn and repeat a few times until everything is incorporated.) Knead in more flour if it is very sticky. It should be soft but not sticking to your hands as you knead. Place on the counter and cover with plastic wrap. Let the dough rest 10 minutes.

3. Line a rimmed-cookie sheet or large-baking dish with waxed paper. Place ¼ cup of flour in a small bowl. With a bench scraper, or a sharp knife, cut dough into quarters and keep covered with plastic wrap. Lightly flour your surface with some flour from the bowl.

DSC_0182 DSC_0183 DSC_0184 DSC_0185 DSC_0186

4. Roll out one of the quarters, forming a rope that is ¾” in diameter. With the bench scraper or knife, cut rope in ½” increments. Place 5-7 pieces in the bowl with the flour and toss to coat. Gently put pieces in a mesh hand strainer and shake off excess flour. Place on rimmed cookie sheet or baking dish in a single layer. Repeat with remaining pieces.

DSC_0199

5. Repeat Step 4 with remaining quarters. (At this point gnocchi can be frozen for later use.) Salt the boiling water as you would for pasta and add dough pieces, stirring immediately so they don’t clump together. (Technique: If you have a lot of gnocchi, boil in batches. This recipe should be fine in one batch though.) Stir again a minute later and with the mesh hand strainer, remove gnocchi from the water once it starts to float to the surface, 1 1/2 to 3 minutes total cooking time. Cover with olive oil, butter, favorite sauce or Sautéed Mushrooms and Tomatoes (recipe below).

 —–

Sautéed Mushrooms and Tomatoes

*Enough to accompany one full recipe of Ricotta Gnocchi*

 —–

Ingredients:

4 oz / ¼ pound pancetta

12 ounces mixed mushrooms, such as oyster, shitake and/or cremini (baby bella) mushrooms

2 large or 3 small cloves garlic, chopped or minced

½ cup Pinot Grigio

1 cup grape tomatoes

Salt and pepper to taste

2 tablespoons chopped parsley

 —–

Equipment:

Cutting board

Chef’s knife

Wet paper towel

Measuring cups/spoons

Large sauté pan

Wooden spoon

Slotted spoon

Preparation:

DSC_0187

1. Cut pancetta into 1” strips (lardons).

DSC_0189 DSC_0191

2. With a wet paper towel, wipe any dirt off mushrooms and trim off the ends. Oyster mushrooms (on the left) need only be trimmed on the very end that holds them together. The stems on the shitaake mushrooms (center) should be removed because they are very tough. The cremini mushrooms (right) should only be trimmed on the very end of the stems. Slice the oyster and shitake mushrooms thinly. Cut the creminis in half, place the flat side down, and cut into thin slices.

DSC_0192

3. Heat a large sauté pan over medium-high heat. Add pancetta and cook until crisp and browned, stirring often. With a slotted spoon, remove pancetta from the pan and return the pan to the heat.

DSC_0193 DSC_0194 DSC_0195 DSC_0196 DSC_0198 DSC_0200

(Apologies-pix got a little steamy!)

4. Add mushrooms and let them sit a few minutes until they begin to brown. Stir and let brown some more. Sauté until they are soft and have shrunk a bit. Add garlic and cook a minute more, stirring once or twice. Add wine and reduce by half. Toss in tomatoes and cook a minute more. Turn off the heat and stir in Ricotta Gnocchi then season with salt and pepper to taste. Spoon into a large bowl or platter and top with pancetta and parsley. Have some of that Pinot Grigio with it.